How to Make Acrylic Display Stand
08/19/2016
If you have a habit of collecting, including books, magazines, balls or anything under the sun, will find an acrylic display stand extremely helpful. However, you may not always get the stand of the right size at the shop. Hence, you can make one custom stand with your own hands and ideas.
It is indeed a fun to make such a acrylic display stand at home and display both your prized possession inside it and the skills that you possess through making it. The procedure requires simple tools that you can easily manage to get and you have every freedom on earth to give it the colour and look you want.
What is required to make an acrylic stand?
You will need the following tools and other materials to make an acrylic stand:
· A saw with carbide teeth
· Acrylic adhesive (it can be used either through a syringe with a needle or a brush)
· Silicone sealant
· Measuring equipment like tape
· Clamps
· Rags and newspapers
· Masking tape
· Drill and drill bits
· Hinges
· Bolts measuring 1/8 inch
· Acrylic sheets (go for low priced ones)
· Safety sunglasses and mask
· Work gloves
· Torch
· Utility knife
· Sandpaper
· A leather strap
· A pair of scissors
· Display items
Getting on with the task:
Here we describe the steps to make the acrylic display stand:
Decide how big will be the display stand
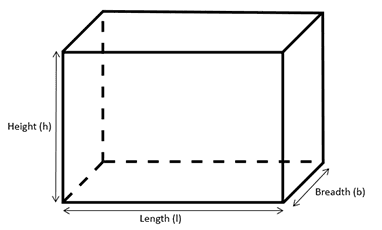
Before beginning the work, you have to decide what you will actually display in the stand. The size of the product will depend on that. You will have to do some mathematical calculation here. Measure the length, breadth and height of the items that you will display and add more inches to the actual measurements so that the items do not fall short of clearance when the product is ready to use. You will require four identical sides and a top and bottom that are same in length to the breadth and depth of the overall display stand.
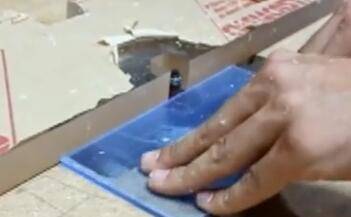
Take full safety measures while cutting the acrylic
 Do wear the safety equipment like the sunglasses, mask and gloves while cutting the acrylic sheets or small pieces and particles can enter your eyes and nose. Spread the newspapers and place the sheets on them while doing the work. Use the utility knife while measuring the pieces onto the acrylic. The pieces can be cut with the saw and the edges can be polished with the sandpaper.
Assembling the display stand
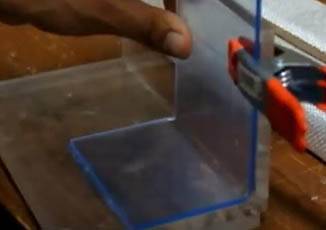
First of all, you have to remove the protective layer on the edge of the acrylic sheets where the adhesive has to be applied. The extra protective layer can be removed with a pair of scissors. It is better to keep the rest of the protective layer intact as it will protect the sheets from getting scratches. Now place one of the ends of the sheets on the work area and apply the acrylic adhesive to the side and add one of the other ends.
Check that the panels are aligned properly before the glue is applied. Apply the adhesive gently so that even a spill can be easily wiped out. Do the same with the third side and soon you will have a box without a covering. Ensure that the clamps are properly connecting the sheets with each other.
The excessive adhesive can be wiped and silicone sealant can be used along the seams inside the acrylic display stand. Leave the adhesive to dry for at least one day. Around two milliliter of adhesive should be more than enough.
A few books can be placed on the panels to ensure that the glue has bonded well.
The finishing touch
The fourth side can be placed on top of the display stand to cover the open space. Once three sides are done, the fourth side might cause some problem. In that stand, move the product in such a way that the bottom sheet faces upwards and place it on the fourth panel. Even if the edges are not looking aligned, there is nothing to worry. Put adhesive on one edge first and ensure that the other edge is getting a support on the acrylic sheet.
Decide where to use the hinges and connect them with the stationary side. Once the door is attached with the hinges, you can locate the display stand the way you want. Apply the masking tape to close the door. About an inch far from the edge, locate the centre of the door opposite to the hinges placed. Do the same on the side around the corner and put a bolt. Cut a piece of the leather and put the bolt through it.
The cover should fit nicely on the bottom panel and not get dislocated. If you feel that you have to reduce the acrylic sheet’s size to ensure the cover to fit better, you can do so before applying adhesive to the sheets at the bottom together.
Sand down the entire product once finished to remove the stain and place your items inside. You can always add on to your product like, for example, using different colors or fitting it with a light.
Things to remember:
· If the sheets are 1/8-inch thick, then they can be broken with hand instead of the saw. But a stand made of that thin sheets will be very delicate to handle.
· Apply adhesives from outside of the stand once the inner seams have dried. This will give extra security.
· Give the glue adequate time to dry. Do not sand immediately after applying adhesive. If you decide to give the product a proper paint, allow enough time for the coats to settle.
· Be alert when using electric tools and wear the protective gear while cutting or sanding down the materials.
The acrylic display stand made at home will give you that much extra satisfaction since it will perfectly cater to your need by being convenient and user-friendly. Of course, the ones available at the market will be more polished and trendy but making one such product at home saves a lot of money.

If you would like a quotation or further information on this product, please
contact us and we will reply to you within 1 working day.

Users Who Viewed Items In Your Recent History Also Viewed